
Cannabis Low Stress Training – The Circle of Life
Cannabis Low Stress Training (LST) – The Circle of Life
Here is a method of low stress training for cannabis plants that works well with feminized plants. This method would also work with autoflower cannabis plants but realize that autoflowers start flowering after about 4-5 weeks. Once flowering starts in earnest you typically want to eliminate most forms of Low Stress Training save for defoliation.
This step by step guide will utilize the hand drawn diagram below. Try not to focus on the horrendous artistic ability and more on the concept and you should understand how to create the cannabis circle of life.
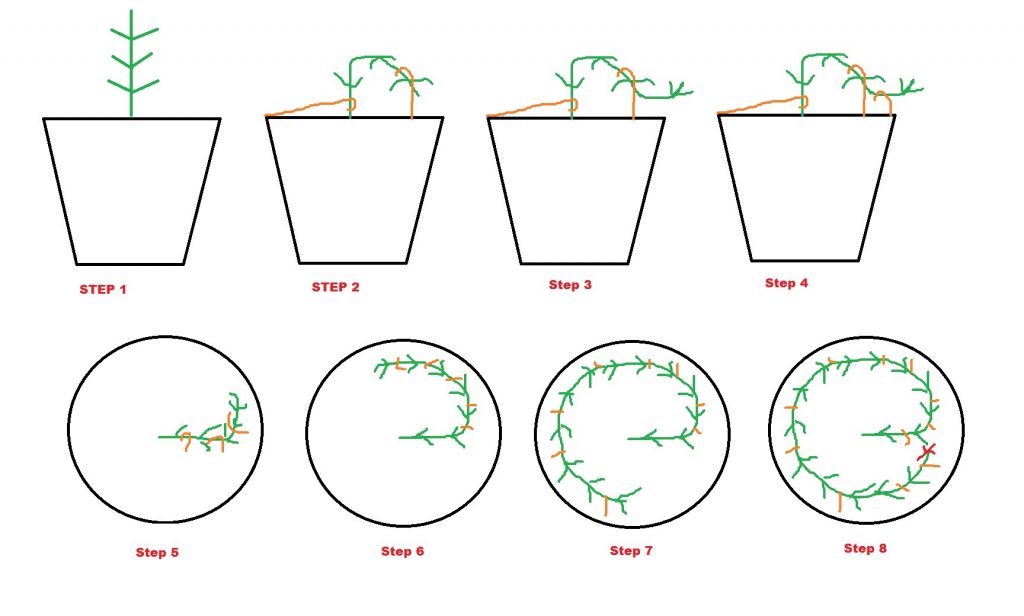
For reference on the diagram, here is a break down of the colors used:
Black : Pot Outline
Green Lines : Main Stem and branches
Orange : Plastic coated tie down or soft ties
Want to learn more about growing the best cannabis? 8 Tips For Growing The Best Cannabis
STEP 1 : Let your plant grow until at least the 3rd node. Some people like to wait until the 4th or 5th node, but the main stem will get harder and harder to bend over time so starting early is normally the safest method.
STEP 2 : Using either plastic covered wire or soft ties, create a candy cane shape. Place the hooked end around the plant after the 2nd node and before the 3rd. Bend the plant as close to 90 degrees as you can and stick the straight end into the soil. You can also make a U shape and have two ends in the soil like a croquet wicket. By bending the plant over we are trying to trick the plant into believing it has several colas instead of one(cannabis plants like to put the most energy into the highest growths. By bending the highest growth we tell the plant to spend energy equally among the growths) and increasing the light to all growths.
STEP 3 : This is an observational/illustrative step. Somewhere between a few hours and a few days after bending the cannabis plant over, the end will begin to grow upwards towards the light again. This is what is being illustrated in step 3.
STEP 4 : Vegetate the plant and wait for the next 2 nodes. Place another tie down between nodes 3 & 4. Continue doing this until you reach the edge of your pot.
STEP 5 : Depending on your beginning pot size you may need to transplant. Step 5 begins when you begin to tie down the plant in a circular fashion following the rim of the pot. Remember to go back and tie down the two branches from each node that has grown the main stem was tied down.
STEP 6 : Continue following the circular path around the rim of the pot. You probably want to keep an inch or two between the tie down anchors and the edge of the pot so they have good anchoring. Some cannabis growers tie down to the pot itself using that as the anchor point instead of the soil.
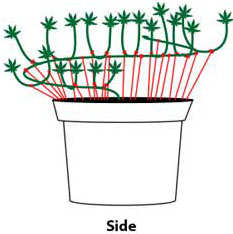
STEP 7 : Continue the path around the pot., You should be going back and tying down any new growths that grow towards the center of the pot. Remember the goal is to create colas out of each node by maintaining a level height among the growing areas.
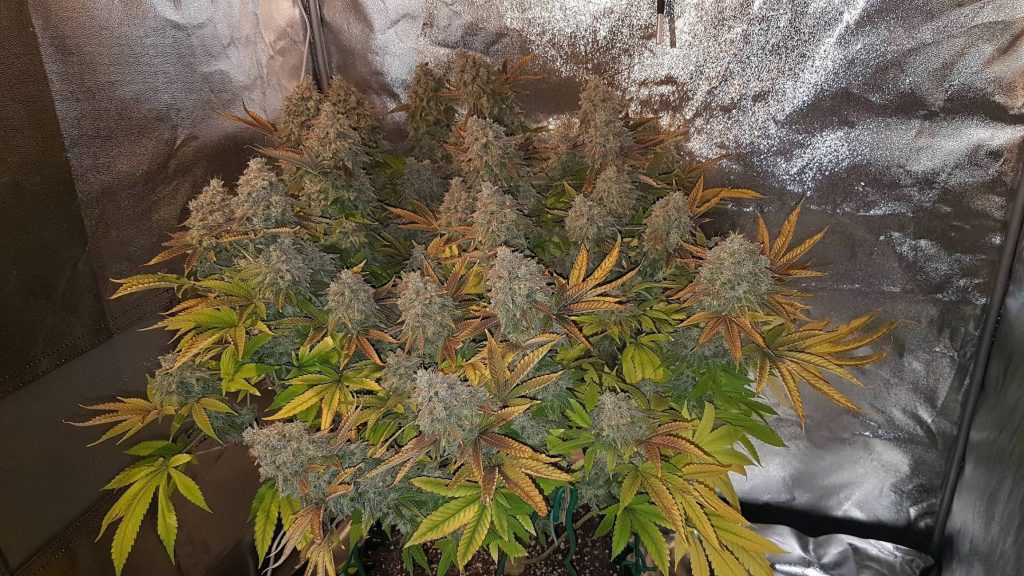
STEP 8 : Once you have completed the circle, top the cannabis plant(cut off the top of it). After a week or so, adjust your nutrients and get ready for flowering. Put the plant on a 12/12 light cycle and enjoy the bountiful harvest.